Update January 12, 2022
Want to start a podcast? You’re not alone. Good news–it’s A LOT easier than you may think, and one of the best things you can do for your business and following, because you can publish targeted content that is highly valuable to your audience. Here’s a step-by-step guide on how to start a podcast that will get you up and running in no time.
1) Choose Your Show Name
Table of Contents
This step is pretty self explanatory. It’s all in the name.
2) Create Your Artwork
To start, you need two main images:
1) You need a podcast graphic that acts as your main show logo. This is the picture that comes up when you find your show in the iTunes store. It should be 1400×1400 pixels, and the lettering should be big enough that you can tell what the graphic says, even if it’s small.
2) You need an image you can attach to each individual mp3 file. You can either create an image without any words, or shrink your main logo down. This image should be 300×300 pixels.
If you’re looking for a way to create your artwork, Canva is a free online tool with preset layouts.
3) Build a Show Website
You’ll need a place to host your WordPress site, so people have a place to go when they want more information about your podcast. Bluehost is my host of choice, and when use this link, you can get a free domain name with hosting packages that start as low as $3.49/month.
Not sure how to set up a WordPress site? See our guide on how to start a blog here.
Add a Podcast Plugin for WordPress
Once you have a site up and running, you’ll need to add a plugin that allows you to actually attach the audio file to a blog post or a page, and to play it.
Blubrry PowerPress is a one & done simple system for podcasting for WordPress. Install it like any other plugin & #boom – you’re ready to go. You can use this plugin a few different ways that I’ll go into a bit more later on.
Get the PowerPress Plugin Here
Another favorite is the Smart Podcast Player, which was designed by my friend Pat Flynn from SmartPassiveIncome.com. It’s a paid plugin, and totally worth it, if you want something that is simple to use and looks amazing. There’s a number of customizations you can make to the player, including social sharing and player color so it matches your company brand.
4) Get Your Equipment
Ultimately, the only important piece of equipment you need is a microphone. There are apps you can use to record podcasts on your phone, but I’d recommend you get an actual microphone instead. Audio quality for podcasts is HUGE. It doesn’t matter how good the quality of your content is.
That said, there’s no need to go crazy with tons of audio mixers or high-end equipment. Here are some of my favorites:
Microphone
Audio Technica ATR2100 – this microphone packs a lot of punch with a (relatively) tiny price. At just under $60, it’s amazing how good the audio quality from this microphone sounds. There are even some pretty big-named podcasters who still use this microphone.
Heil PR40 – This is a big jump up from the ATR2100. If you want a broadcast-like sound, this is your microphone.
Other Accessories
Mic Windscreen – An important addition for whatever microphone you get. Windscreens help decrease the airflow that hits the microphone when you say words that have “poppy” letters, like “S”, “P,” and “T”.
Mic Stand – Stands make life so much easier. Just get one.
5) Pick Your Editing Software
Audacity – This open source software works on your PC & Mac. It’s super-simple to use and is the best audio editing program out there (and it’s free!)
Garageband – This comes with your Mac and you can use it if you want, but it’s sort of a pain in my experience to use continually.
By far, my favorite software to use is Adobe Audition. It’s super easy to use, and you can do some pretty amazing things to make your audio sound amazing.
You can get Audition only for $20/month, or you can upgrade and have access to the whole Adobe Creative Cloud for $50/month, which includes Photoshop, Illustrator, InDesign and a number of other Adobe products.
Because each program is different, I won’t go into specific editing strategies here. You can learn how to edit audio with each of these programs through Lynda.com. Regardless of the program you decide to use, you can typically record straight into the the program. Double check your settings and do a few trial runs to make sure everything is running correctly, especially before you do any interviews.
After your recording is finished, go through and listen again. You may want to cut out long spaces, “um’s”, “ah’s”, and other filler words that break up the message. You can also remove clicks, microphone “pops” and other background noise that distract the listener (though the best thing to do is make sure you’re recording in a good environment first).
When you’ve got audio you’re happy with, it’s time to save and export your finalized audio as an mp3 file.
6) ID3 Tagging
Now that you have your saved mp3 file, you’re ready to tag the episode.
ID3 tagging is one of the most important, and most forgotten steps in podcasting. According to Apple, ID3 tags “allow information such as the title, artist, album, track number, and other information about the file to be stored in the file itself.“
You’ll need 3rd party software to tag the file, but there are plenty you can use. You can do a google search for “free ID3 tag software” and a number of options will come up.
Personally, I use ID3 Editor, which is available for both Windows and Mac.
When you open the ID3 Editor, you’re asked to pick which file you want to tag. Find your mp3 and open the file.
The program looks like this.
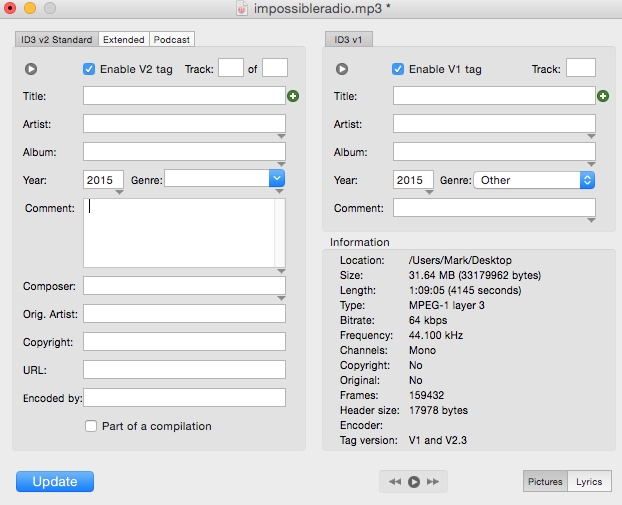
It looks like there’s tons of information you need to fill in, but there’s just a few you should focus on.
Fill in the:
- title (name of the episode)
- artist name (that’s you)
- album name (the name of your podcast show)
- year (this should automatically populate based on the current year)
- comments (information for the listener that describes what your episode is about)
That’s it! Once all the information is in, it should look like this.
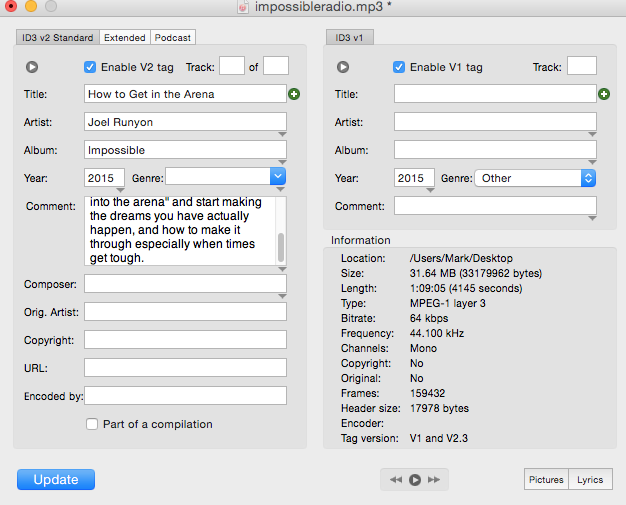
There’s just a few more steps and you’ll be ready to go. Click the little arrow and all the important information transfers over to the right side of the screen.
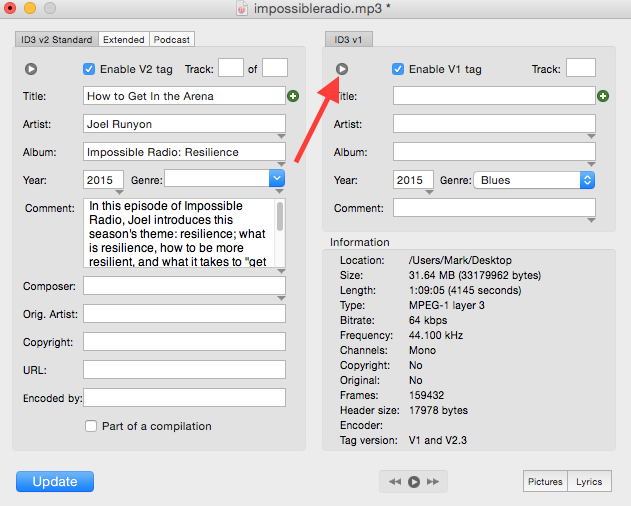
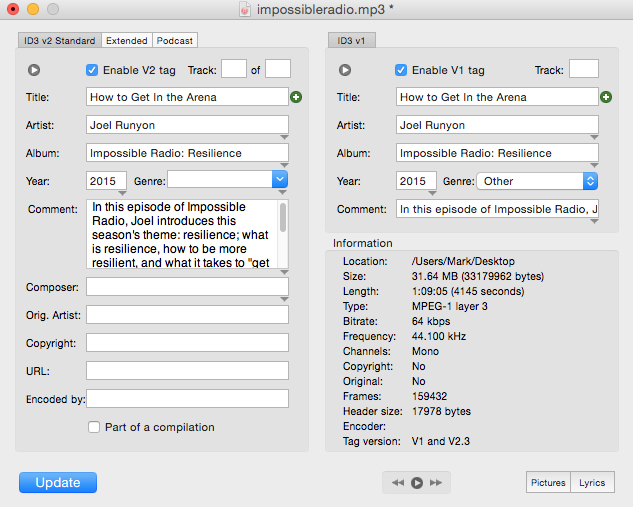
Now copy everything from the comment section and click the “podcast” tab on the top.
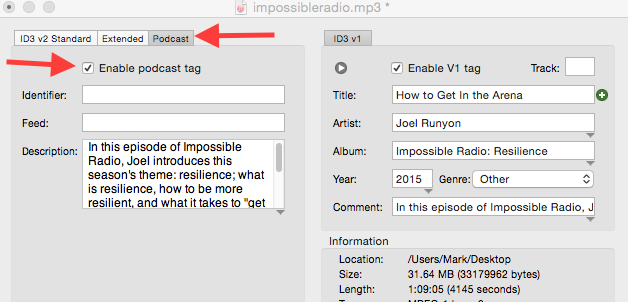
Click the box that says “enable podcast tab”.
Paste all the “comments” in the description box.
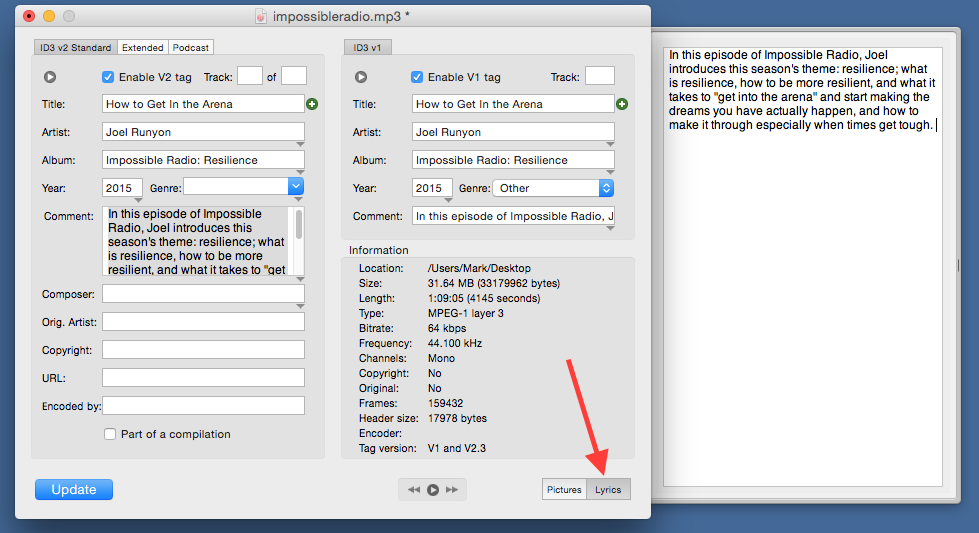
Now click on the Lyrics box in the lower right hand corner of the program. A new window slides open. Paste the “comments” in that description box as well.
One last thing. Click on the “pictures” box in the lower right hand corner. A new window slides open. Drag the logo for your podcast into the viewer. Use the version that is 300×300 pixels.
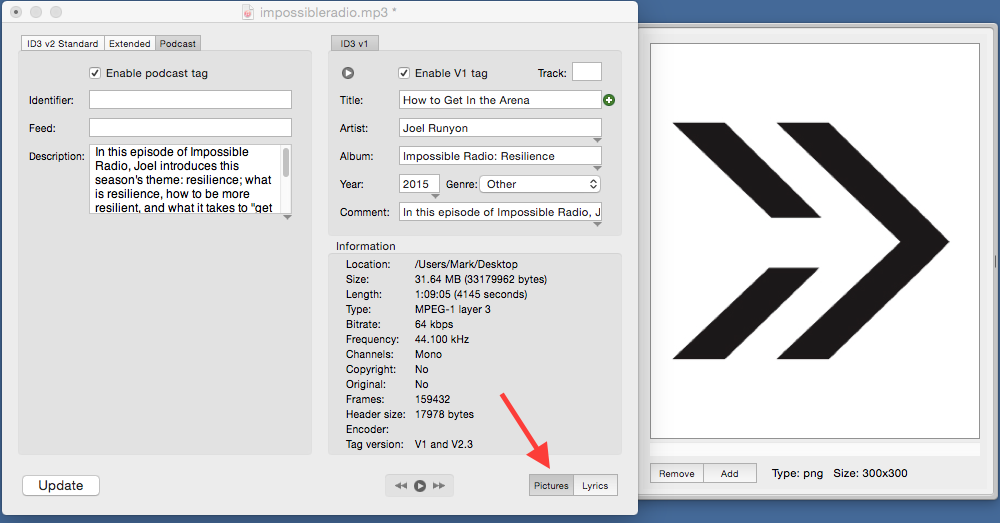
Whew! That’s it. Now in the bottom left hand corner click “update”, and your mp3 file will automatically update and show your logo artwork and have all the necessary tags.
7) Upload Your File to Libsyn
With your tagged mp3 file, you’re ready to upload the episode to Libsyn.
Libsyn is the defacto hosting site of choice for podcasts. You need somewhere to host your files that can handle hundreds, and even thousands of downloads in a day.
Technically, you could host each episode on your website, but you could end up costing yourself thousands of dollars over time and a lot of headaches, since website hosting isn’t designed to handle that many downloads in a day.
Libsyn makes it really easy.
Create your account
Go to libsyn.com. If you don’t have an account already, click “Sign up” in the top right hand corner. You’ll need add in credit card information and choose a user name and password. Once you’ve finished adding in your details and gotten your login details, go ahead and login to the Libsyn system.
When you first login, you’ll see the main dashboard where you’ll be able to see a quick snapshot of your show stats, including how many downloads you’ve had over the last three months. Even if you’re just starting and you don’t have many downloads, it’s still pretty exciting to see how many you’ve had on a day, week, or month.
Since it’s the first time you’ve logged in, you’ll need to set up your show.
Click on Settings from the Libsyn Dashboard > Edit Show Settings
Here’s the quick rundown to set up the main parts of the show:
- Add your show title (what your show’s name is)
- Show description (what your show is about)
- Add your website address (the website you set up earlier)
- Add tags and keywords (topics you may cover in your show that help people find you)
- Public Contact Email (how people can get ahold of you)
- iTunes Store Web Address (the URL Apple assigns when your podcast is approved)
- Copyright Notice (if you want one)
- Add your artwork (the 1400×1400 pixel version)
- Click Save
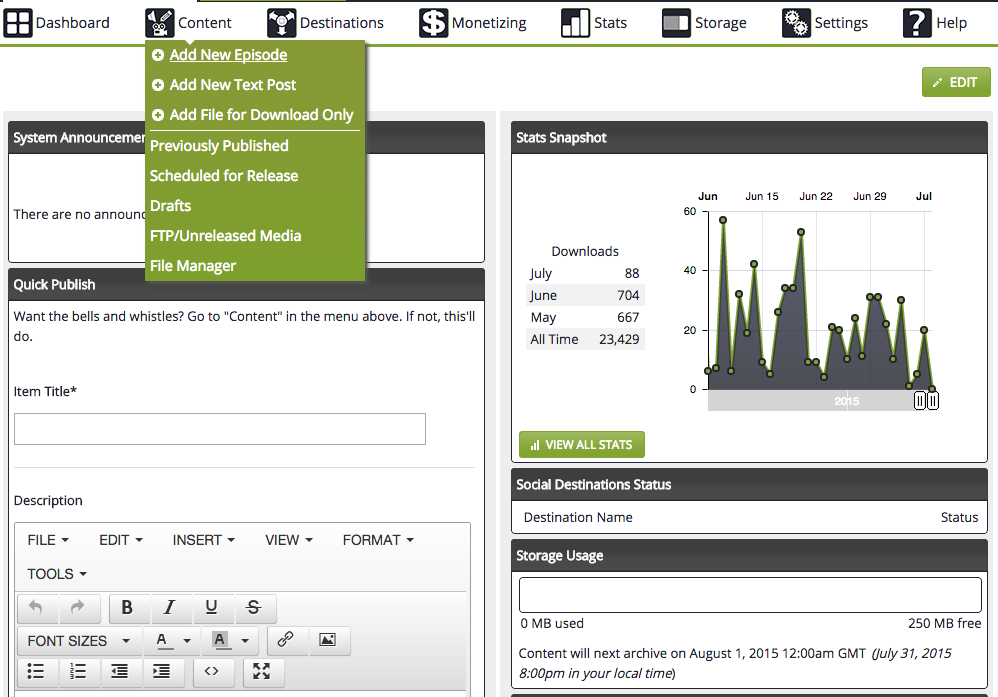
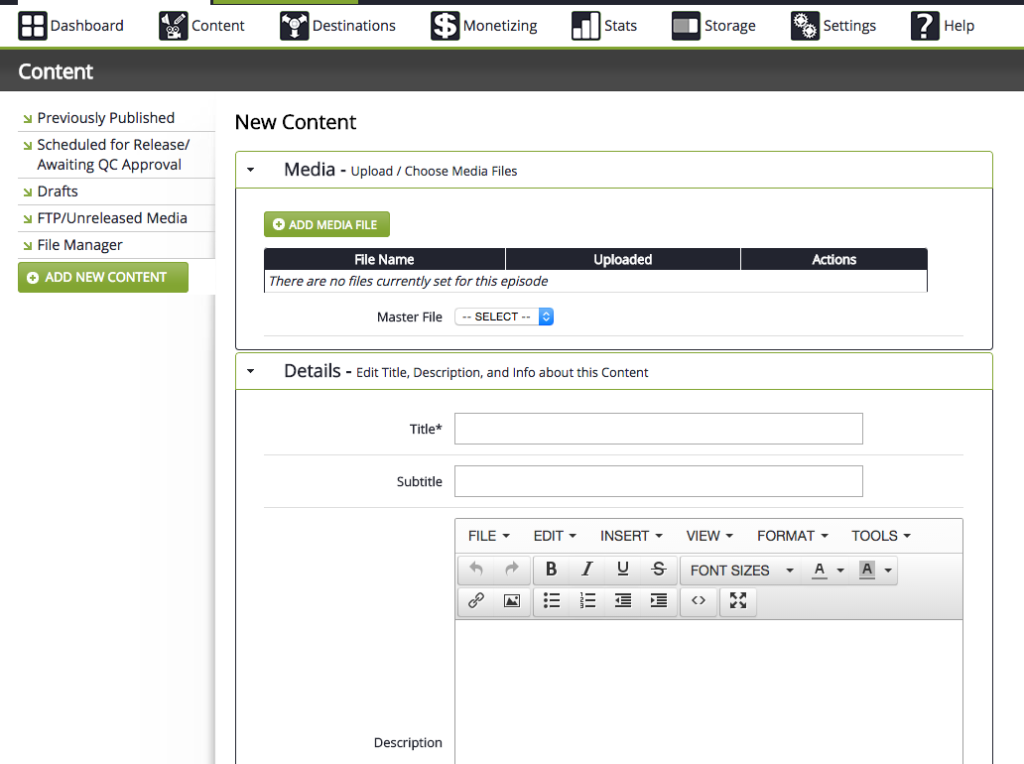
Now Click on “Content”, and then “Add New Episode”
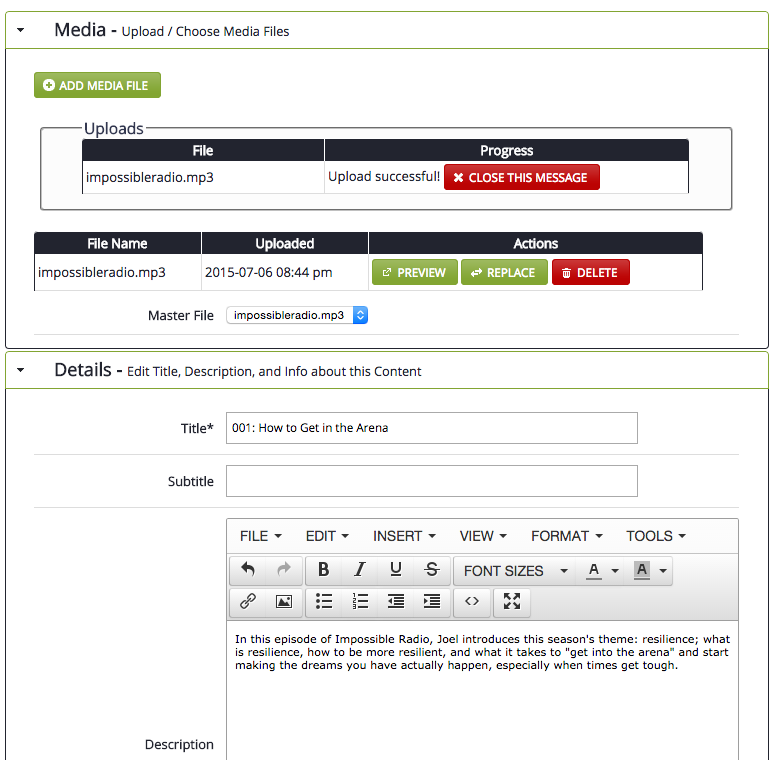
Once you get to this page, click “Add Media File”. You can find your mp3 file and start uploading it to the Libsyn server.
Add your episode title and description (you can copy over what you used when you tagged the episode)
Scroll down to the bottom of the page.
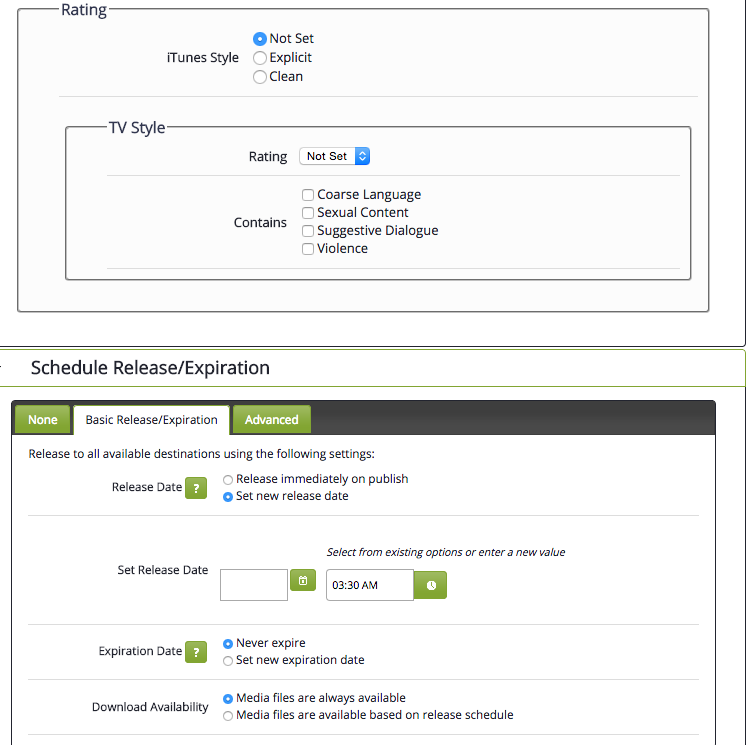
You’ll see the “rating” section. I usually leave it to “not set”, which is fine unless you have explicit language or content. If you do have harsh language or content, click “explicit”.
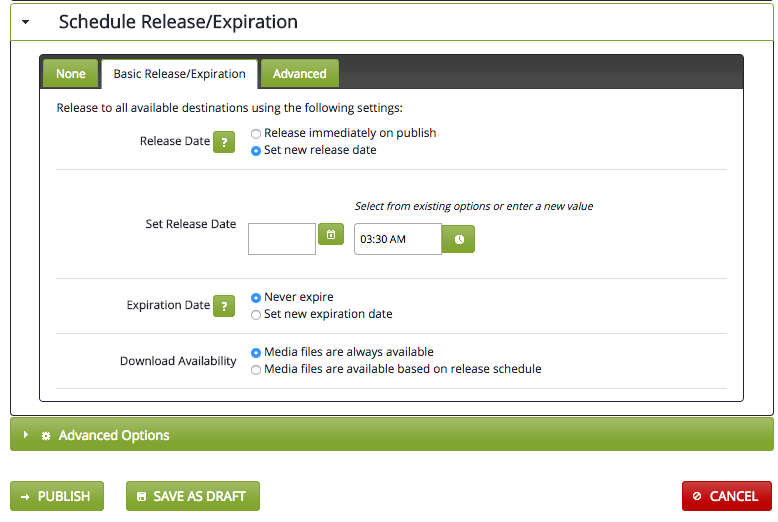
Scroll down a little further to “Schedule Release/Expiration” and click open the tab. You can set your episode to publish immediately, or you can schedule it to automatically publish at a future date and time. This is an awesome feature, which makes it so your podcast episodes can go live, even when you’re not around to hit “publish.”
Last step!
Scroll down to the bottom and click “Publish”
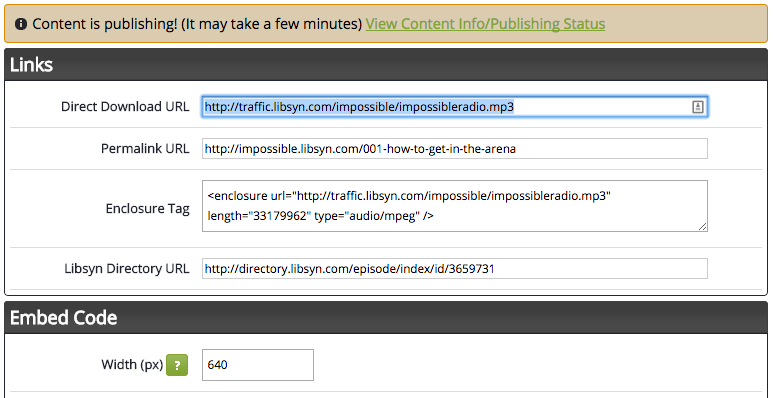
You’ll see a popup screen that gives you a “Direct Download URL” for the episode.
Highlight and copy the link, and jump back over to your website.
When you go to add a new post in WordPress for the episode, scroll down and you’ll see a section for your “Podcast Episode”. This is for the PowerPress plugin.
Paste the link in the Media URL box click “verify URL”. Once the link is verified, the PowerPress podcast player will automatically show up when you preview or publish the post.
8) Submit Your Show to Podcast Directories
Now you’ve got a live podcast!
If you really want people to be able to find it, you need to submit it to different podcast directories for syndication.
There are plenty of options; iTunes is one of the most important, but others will do well too. For this guide, we’ll show you how to do both iTunes and Stitcher.
iTunes
Apple has some pretty strict rules, but they’re pretty easy to follow, and we’ve pretty much covered everything you’ll need to know to set yourself up to be approved by Apple.
Go back to Libsyn and get your RSS feed address (Click Destinations > Edit or View Existing > Libsyn Classic Feed)
Once you have your RSS feed, submit it to iTunes here
Apple may take a few days to approve the feed. Just make sure you have at least one episode that is “live”, so they can see what your podcast is like when they approve it.
And you’re done!
Stitcher
Submitting to Stitcher is relatively easy. Just go here
Submit your podcast to Stitcher
Advanced Podcasting Strategies
Check out these
- Free Podcast Course
- Podcaster’s Paradise by John Lee Dumas
- Pat Flynn’s MONSTER Podcasting Guide
- Cliff’s How To Podcast Post
- Podcast Marketing
I’m by no means the podcast marketing guru, but if you’re first starting out, this guide hopefully will be helpful.


Leave a Reply